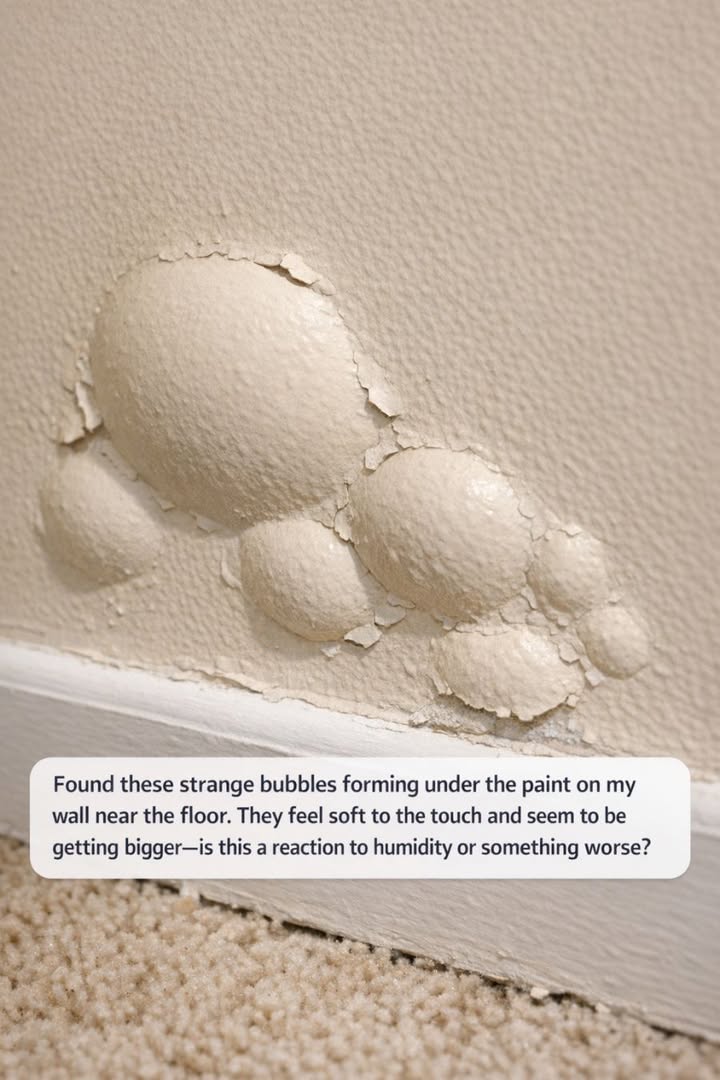
To determine if the bubbling is purely a result of humidity or if there is a more significant problem, start by assessing the environment. Measure the humidity levels in the room using a hygrometer; levels above 60% can contribute to paint bubbling due to excess moisture in the air.
Examine the location of the bubbles. If they are concentrated near a water source, such as a bathroom or kitchen, humidity might be the culprit. However, if the bubbles are widespread or located on interior walls away from water sources, this could indicate a leak within the wall or rising damp from the floor.
3. Common Moisture Sources Hiding Behind Bubbling Paint
Discover more
Bathroom furniture
dehumidifier
Dehumidifier
Several common sources of moisture can lead to bubbling paint. These include leaks from plumbing pipes within the walls, roof leaks that allow water to seep down the walls, and condensation from poorly insulated areas.
In older homes, moisture can also come from the ground through a process known as capillary action, where water is drawn up through the foundation into the walls. Identifying the source of moisture is essential for addressing the issue effectively.
4. Signs The Bubbles Point To A Leak Inside Your Wall
If the bubbles are accompanied by other signs such as discoloration, mold growth, or a musty odor, this strongly suggests a leak inside your wall. Other indicators include peeling paint, crumbling drywall, or a consistent wetness in the same area, even when it has not rained.
An infrared camera can help detect moisture behind walls without causing damage, highlighting cooler areas indicative of moisture presence.
5. When Rising Damp From The Floor Is The Real Culprit
Rising damp occurs when moisture from the ground rises through the walls by capillary action. This is especially common in older buildings without a proper damp-proof membrane. Look for a tide mark on the lower part of the wall, salt deposits, or a musty smell, which are telltale signs of rising damp.
Measuring the moisture content at different heights of the wall using a moisture meter can confirm rising damp, with higher moisture content closer to the floor.
6. Other Sneaky Causes: Poor Prep, Old Paint, And Vapor Barriers
Improper surface preparation before painting can lead to poor adhesion and subsequent bubbling. This includes failing to clean the surface, not allowing it to dry completely, or applying paint in unsuitable conditions.
Using old paint or low-quality paint can also result in bubbles, as can the presence of vapor barriers on the warm side of wall insulation, which can trap moisture and cause it to condense.
7. Quick Tests You Can Do Today To Track Down The Moisture
Perform a simple moisture test by taping a piece of aluminum foil to the wall where the bubbles are present. Leave it for 24 hours, then check for condensation. If moisture is present on the wall side of the foil, it indicates a problem within the wall.
Additionally, inspect nearby plumbing fixtures for leaks and check your roof and gutters for signs of water ingress. Using a moisture meter to check the wall’s moisture content can also provide valuable insights.
8. Immediate Steps To Stop The Damage From Getting Worse
First, reduce humidity levels in the room by using a dehumidifier or increasing ventilation. If you suspect a leak, turn off the water supply to the affected area and contact a plumber. For rising damp, consider installing a damp-proof course to prevent further moisture ingress.
Temporarily remove the bubbling paint to allow the wall to dry out. This will prevent further damage and mold growth until permanent repairs can be made.
9. How Pros Diagnose Moisture Intrusion Behind Painted Walls
Professionals use a combination of tools and techniques to diagnose moisture problems. Thermal imaging cameras can detect temperature differences that indicate moisture presence. Moisture meters provide precise readings of the moisture content in walls and floors.
In some cases, professionals might remove a small section of drywall to visually inspect for leaks or mold. They may also employ pressure tests to determine if plumbing leaks are contributing to the problem.
10. Repair Options: From Simple Repainting To Opening The Wall
For minor bubbling due to humidity, improving ventilation and repainting with moisture-resistant paint might suffice. Remove the affected paint, allow the wall to dry completely, and apply a primer before repainting.
For issues like leaks or rising damp, more extensive repair work may be necessary, such as fixing plumbing leaks, installing a damp-proof membrane, or even opening up the wall to repair structural damage and replace insulation.
11. Preventing Future Bubbles With Better Ventilation And Waterproofing
Ensuring proper ventilation in areas prone to high humidity, such as bathrooms and kitchens, can prevent future bubbling. Consider installing exhaust fans or opening windows to improve air circulation.